Why Microscopy Matters in Biology?
Microscopy is a crucial tool in biology, allowing scientists to explore the invisible world of microbes and cells. It reveals structures too small for the naked eye, from bacterial morphology to eukaryotic cell organization. Without microscopes, studying soil bacteria or observing mitosis in onion root cells would be nearly impossible. This technique provides key insights into processes such as pathogen infection, cell division, and tissue function. For biology students, learning microscopy goes beyond exams, fostering essential skills for independent scientific investigation.
This blog post explores the essential principles of microscopy, starting from the physics of light and lenses, through the working of bright-field microscopes, to the significance of resolution and specimen preparation. By the end, you should be able to connect theory to practice and sharpen your skills in observing the microscopic world.
Biophysics Quick Notes | Biophysics PPTs | Biophysics MCQs
The Fundamentals – Lenses and the Bending of Light
At the heart of microscopy lies a simple yet powerful concept: refraction—the bending of light as it moves from one medium to another.
When light passes from air into a denser medium like glass, it slows down and bends toward the normal (an imaginary perpendicular line). This phenomenon is what makes a straw look bent in a glass of water. For microscopy, this bending of light is key to magnifying small objects.
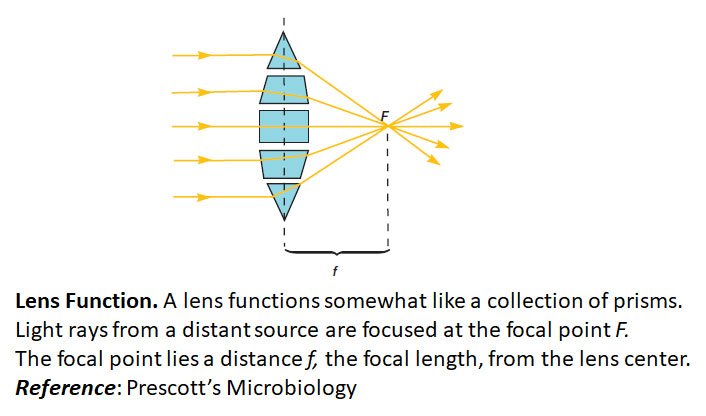
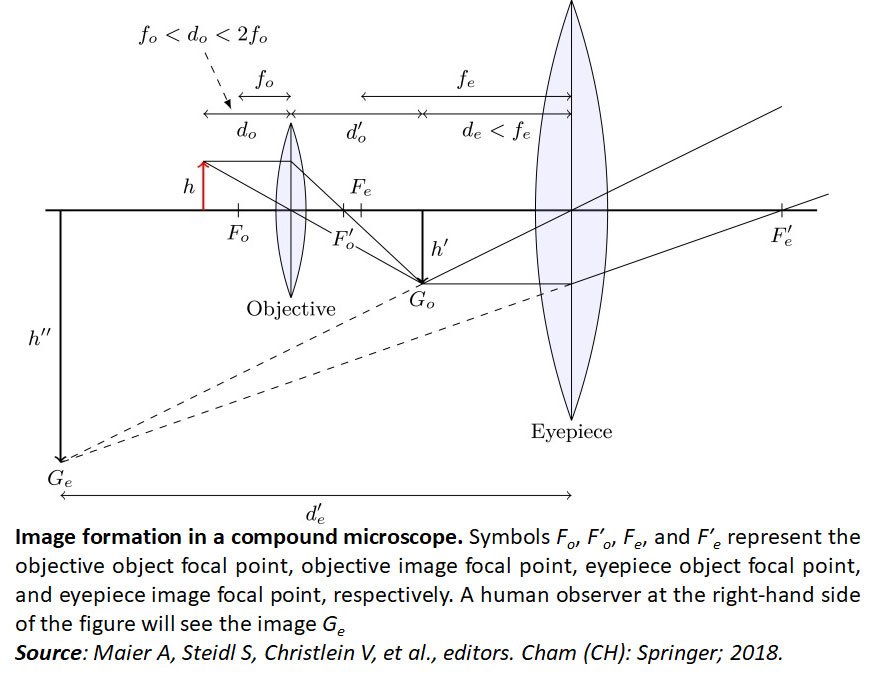
A convex lens, which is thicker in the middle than at the edges, bends parallel rays of light to converge at a focal point. When an object is placed near the focal point, the lens produces a magnified virtual image that the eye perceives as larger than reality.
For students, understanding refraction is more than theory—it explains why:
- The focal length of a lens matters for magnification.
- Immersion oil reduces light loss by minimizing refraction at the air-glass interface.
- Misalignment or poor focusing can distort images.
Units of measurement also matter:
- Millimeter (mm): useful for larger specimens like tissues.
- Micrometer (µm): the scale of bacteria and many single-celled organisms (1 µm = 10⁻⁶ m).
- Nanometer (nm): essential when discussing viruses, which are beyond the resolving power of light microscopes.
Diving into the Bright-Field Microscope
The bright-field microscope is the workhorse of most teaching and research labs. It creates a dark image against a bright background, allowing students to observe stained specimens with relative ease.
Key Components of a Bright-Field Microscope and Their Functions
- Ocular lens (eyepiece): usually 10x magnification, where you place your eye.
- Objective lenses: scanning (4x), low power (10x), high power (40x), and oil immersion (100x).
- Stage: a platform that holds the glass slide in position.
- Condenser lens: focuses light from the illuminator onto the specimen.
- Iris diaphragm: adjusts light intensity and contrast.
- Illuminator (lamp): provides the light source.
- Coarse and fine focus knobs: adjust the clarity of the image at different magnifications.

How Microscope Works?
Light passes from the illuminator through the condenser, strikes the specimen, and continues through the objective lenses before reaching the ocular lens. Each step bends and magnifies the image.
Total magnification is calculated as:
Total Magnification = Objective Power × Ocular Power
For example, a 40x objective with a 10x ocular lens yields 400x magnification.
| You may also like NOTES in... | ||
|---|---|---|
| BOTANY | BIOCHEMISTRY | MOL. BIOLOGY |
| ZOOLOGY | MICROBIOLOGY | BIOSTATISTICS |
| ECOLOGY | IMMUNOLOGY | BIOTECHNOLOGY |
| GENETICS | EMBRYOLOGY | PHYSIOLOGY |
| EVOLUTION | BIOPHYSICS | BIOINFORMATICS |
Practical Tips for Students
- Start with the lowest objective to locate your specimen.
- Use coarse focus at low power, then fine focus at higher powers.
- Adjust the iris diaphragm to balance brightness and contrast.
- Use immersion oil only with the 100x oil immersion lens.
- Remember that bright-field microscopy works best for stained, non-living specimens larger than ~0.2 µm.
Mastering Resolution and Numerical Aperture
Magnification without clarity is meaningless. The true power of a microscope lies in its resolution—the ability to distinguish two points that are very close together.
The Concept of Resolution
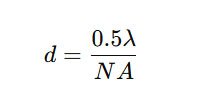
Resolution depends on both the wavelength of light (λ) and the numerical aperture (NA) of the objective lens:
Where:
- d = minimum resolvable distance
- λ = wavelength of light (about 0.55 µm for visible green light)
- NA = numerical aperture
The smaller the value of d, the better the resolution.
Numerical Aperture Explained
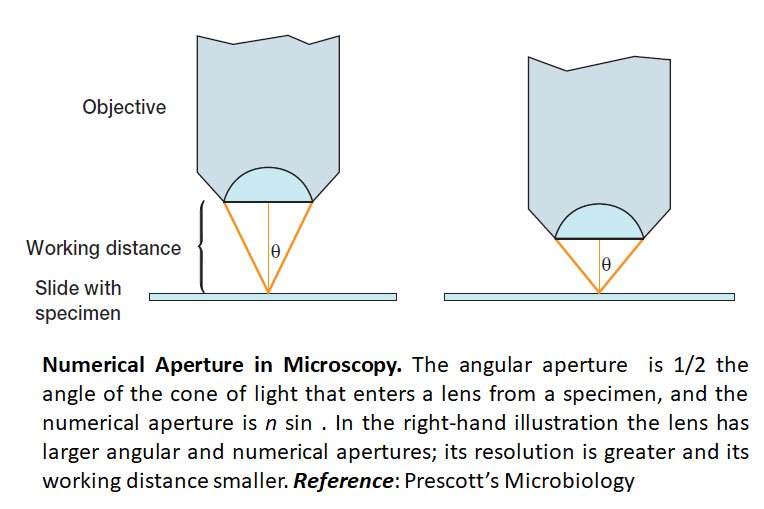
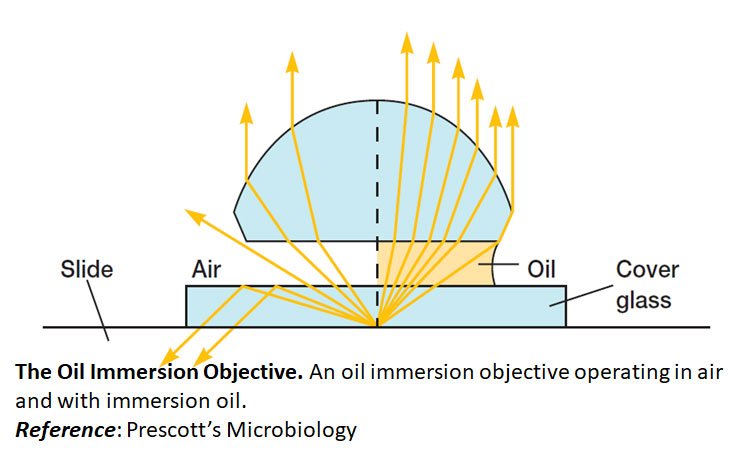
Numerical aperture measures how much light a lens can collect. In other words it is the light gathering capacity of a microscope.
NA = n sin θ
- n = refractive index of the medium (1.0 for air, 1.5 for oil).
- θ = half the angle of the light cone entering the lens (see the image)
Using oil immersion between the slide and 100x lens increases n, thereby increasing NA and improving resolution. This allows you to distinguish objects as close as 0.2 µm apart—essential for studying bacteria and other small objects.
Why Resolution Matters?
- Viewing bacterial morphology requires high resolution, not just high magnification.
- Blue light (shorter wavelength) provides better resolution than red light.
- Poor specimen preparation or insufficient illumination can still blur images, even with high-quality lenses.
Specimen Preparation – From Sample to Slide
Most microbes are transparent and nearly invisible under a microscope unless properly prepared. Specimen preparation enhances contrast, preserves structure, and makes detailed observation possible.
Steps in Preparation
- Fixation: preserves structure and prevents decay.
- Heat fixation: kills and adheres bacteria to the slide.
- Chemical fixation: uses agents like formaldehyde to stabilize delicate structures.
- Staining: adds contrast.
- Simple stains: one dye (e.g., methylene blue) to highlight shape and arrangement.
- Differential stains: multiple dyes to distinguish between types (e.g., Gram stain).
- Special stains: for specific structures, like spore staining or flagella staining.
- Smear preparation: spread a thin film of specimen, air-dry, fix, and stain.
- Thin smears avoid overcrowding and allow individual cells to be seen clearly.
- Wet mounts: used for observing living specimens, though details may be limited without staining.
Common Pitfalls
- Over-staining can obscure details.
- Uneven smears cause blurred images.
- Improper fixation may distort cell morphology.
When done properly, these steps bring out cellular structures such as endospores, flagella, or cell walls, providing reliable insights into microbial identity and behavior.
Putting It All Together for Your Biology Journey
Microscopy is more than a laboratory technique—it is a foundation for understanding life at the cellular level. The principles of refraction, lens design, resolution, and numerical aperture provide the physics behind the instrument. Bright-field microscopy gives a practical framework for observing stained samples, while specimen preparation ensures clarity and accuracy.
As you advance in biology, you will encounter more sophisticated tools—phase-contrast, fluorescence, and electron microscopes—that build upon these fundamentals. But without mastering the basics of light microscopy, those advanced methods remain inaccessible.
So, next time you step into the lab:
- Think about how light bends through the lenses.
- Pay attention to how contrast changes with the diaphragm.
- Remember that resolution, not just magnification, reveals true detail.
- Take the time to prepare specimens carefully—it will pay off in sharper, more meaningful observations.
Microscopy is both an art and a science, blending technical precision with observational skill. By practicing diligently, you are not just preparing for exams—you are training to uncover the microscopic dimensions of life itself.
Final Thoughts
Understanding the essential principles of microscopy equips biology students with the confidence to approach laboratory work with curiosity and precision. The invisible world of microbes is vast, intricate, and waiting to be explored. Your microscope is the bridge between that hidden reality and your understanding of biology.
Ready to level up? Try experimenting with different light settings, prepare a set of Gram-stained slides, and challenge yourself to identify structures at the limits of resolution. And if you’re eager to push further, stay tuned—our next posts will explore fluorescence microscopy and electron microscopy, where light gives way to even finer revelations of the microbial world.
What’s your biggest microscopy challenge? Share your thoughts in the comments below!
FAQ on Microscopy
Short Answer Questions (10)
- Define refraction and explain its role in microscopy. (Remember/Understand)
- What is the function of the condenser lens in a bright-field microscope? (Remember)
- Calculate the total magnification when using a 40x objective and a 10x ocular lens. (Apply)
- Why is immersion oil used with the 100x objective lens? (Understand)
- State the resolving power formula and identify the variables it depends on. (Remember)
- Differentiate between a micrometer and a nanometer in terms of biological scale. (Understand)
- What is the purpose of the iris diaphragm in a microscope? (Remember/Understand)
- List two advantages of chemical fixation over heat fixation. (Understand)
- Mention one limitation of bright-field microscopy. (Understand)
- Why is resolution more important than magnification in microscopy? (Analyze)
Short Essay Questions (10)
- Explain how a convex lens produces a magnified virtual image. (Understand)
- Describe the sequence of light travel through a bright-field microscope. (Understand)
- Compare and contrast simple, differential, and special staining techniques. (Analyze)
- Discuss the role of numerical aperture (NA) in determining resolution. (Analyze)
- Explain why blue light improves resolution compared to red light. (Analyze)
- Outline the steps in preparing a bacterial smear for staining. (Apply)
- What are common pitfalls in specimen preparation, and how can they be avoided? (Evaluate)
- Discuss how fixation preserves cellular structures during microscopy. (Understand/Analyze)
- Differentiate between magnification and resolution with appropriate examples. (Analyze)
- Explain why mastering light microscopy is essential before using advanced microscopy techniques like fluorescence or electron microscopy. (Evaluate)
Essay Questions (3)
- Discuss the essential principles of bright-field microscopy, highlighting the relationship between light, lenses, and image formation. (Analyze/Synthesize)
- Evaluate the significance of resolution and numerical aperture in studying microorganisms, and explain how immersion oil enhances image clarity. (Evaluate/Apply)
- Analyze the process of specimen preparation in light microscopy. How do fixation, staining, and smear preparation contribute to accurate microbial observation? (Analyze/Evaluate)
Download the answer key of this questions in PDF
Reference:
- Willey, Joanne M., Linda Sherwood, and Christopher J. Woolverton. Prescott’s microbiology. Vol. 7. New York: McGraw-Hill, 2011.
Download Quick Notes on Principles of Microscopy PDF
<<< Back to Biophysics Quick Notes
| You may also like... | ||
|---|---|---|
| NOTES | QUESTION BANK | COMPETITIVE EXAMS. |
| PPTs | UNIVERSITY EXAMS | DIFFERENCE BETWEEN.. |
| MCQs | PLUS ONE BIOLOGY | NEWS & JOBS |
| MOCK TESTS | PLUS TWO BIOLOGY | PRACTICAL |